
All DNS Records and Settings for Google Suite Domain


G Suite is a cloud-based business suite from Google which is targeted for smoother and easier business operations. Google Suite formerly known as ‘Google Apps for Work’ and ‘Google Apps for Your Domain’ has now upgraded all of its G Suite apps.
G Suite is a brand of cloud computing, productivity and collaboration tools, software and products developed by Google.
Scope of Article
- Domain Verification
- MX Records Settings
- Setting up Authentication for Sending Emails (SPF)
- DKIM DNS Records for Domain Spam Proof
- Sub Domain DNS Records
Domain Verification
Domain Verification is needed to make sure the domain which is being used at Google Suite is owned by the user. There are several methods to verify domain name.
- Login with G Suite Account at admin.google.com.
- On Homepage you’ll see Go to Setup Option, Open it.
- Then Click on Verify Domain.
- You can verify domain using three methods Meta Tag, HTML File Upload or DNS (Use any one).
- To verify using Meta Tag copy the given code and paste it on homepage of your domain before head element as shown below and click verify.
- To verify using HTML File Upload download the file by choosing from the option at Admin Site and upload the file at root of your domain. The method is complex and first time users always gets problems.
- To verify using DNS method (Best, Easy and Recommended) because we’ll need to use DNS to add more records later. Follow below instructions.
- Login to your DNS Provider, where your domain is purchased or if you’ve changed Name Servers at the appropriate location. Most of the times Google shows where your domain is hosted.
- We are using Cloudflare here so after selecting DNS Settings at CLoudflare we’ll add a TXT record.
- Select the DNS type to TXT Record.
- There are two values for addition, one is Host and other one is Value, If you are using subdomain then you need to enter the subdomains suffix i.e for testmail.example.com use testmail and for example.com use @ sign. replace example.com with your domain.
- now copy the value from Google Admin Page and paste it into the Value Bar and Click on Ok or Save Button.

- After adding the DNS Record for 5 to 15 Minutes and Click on Verify, your domain will be verified and it may take time upto one hour if Records are added correct.
Add another Domain (Optional)
- On the Left Panel on your Admin Screen go to the Accounts Option and Select Domains.
- or You may found the Domains Tab on the Homepage of Google Admin.
- Click on Add/remove domains.
- Click on Add Domain.
- and Follow the same verification process.
- You can add alias or another domain depending on your requirements. if you don’t know about this select alias.
- Verify as above.
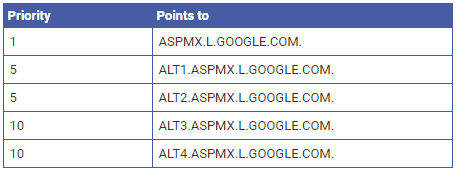
MX Records Create/Modify
- Check your DNS if there are any MX Records remove them and add from below method.
- Open DNS Settings for Your Domain.
- Select Add a MX Record
- Select Host as @ or subdomain (as applicable)
- In Value enter
ASPMX.L.GOOGLE.COM - In Priority enter 1
- Add Another MX Record
- Select Host as @ or subdomain (as applicable)
- In Value enter
ALT1.ASPMX.L.GOOGLE.COM - In Priority enter 5
- Add Another MX Record
- Select Host as @ or subdomain (as applicable)
- In Value enter
ALT2.ASPMX.L.GOOGLE.COM - In Priority enter 5
- Add Another MX Record
- Select Host as @ or subdomain (as applicable)
- In Value enter
ALT3ASPMX.L.GOOGLE.COM - In Priority enter 10
- Add Another MX Record
- Select Host as @ or subdomain (as applicable)
- In Value enter
ALT4.ASPMX.L.GOOGLE.COM - In Priority enter 10
- See All Values in Image Below.
Creating DKIM Record
- DKIM Record is used to Authenticate Emails.
- It is like a Signature used to identity if the email was sent by the given domain.
- Open admin.google.com after 24-48 hours of MX Addition.
- Search for SETTINGS FOR GMAIL.
- Click on Authenticate Email.
- Select your domain if shows more than one.
- Click on Generate Record.
- Select DKIM Key to 2048.
- Leave Prefix as google.
- Click on Generate.
- If you see error like below, then try after 24 hours.
We are unable to process your request at this time. Please try again later. (Error #1000) * If it generates the code. * Open your DNS Settings. * Create a TXT record. * Select Host as given above code. * It should looks like below.
google._domainkey * In Value paste the big code copied from admin panel above. * and then go to above page and click on verify. * It will say Status: Authenticating email. * Your SPF is live and working now.
Creating SPF Record
- Add a SPF TXT Record which is necessary for overall flow of emails on G Suite.
- Add a TXT record in your DNS Settings.
- Add Host as @ or subdomain (as applicable)
- In Value Enter below value.
v=spf1 include:_spf.google.com \~all
Adding DMARC Record
- DMARC Records are used to Prevent Spams. Read More.
- The Basic DMARC Record is given below
Host:
_dmarc - For no action on spams
Value:v=DMARC1; p=none
- For quarantine spams
Value:
v=DMARC1; p=quarantine - For Blocking spams
Value:
v=DMARC1; p=reject - You can also add your email to receive reports of quarantine or blocked spams using rua=mailto:username@domain.com and it may looks like this.
Value:v=DMARC1; p=reject; rua=mailto:username@domain.com
Email using Sub Domains
- To use subdomain just add your subdomain prefix like for sub.domain.com just use sub after the host value. eg.
host for DMARC:_dmarc.sub
If you have questions feel free to comment below.